Coffee Table Railway
Gauge: 009 Peco 009
Power Control: DC only - Might be configured for automatic running
Status: Work in progress
The Plan
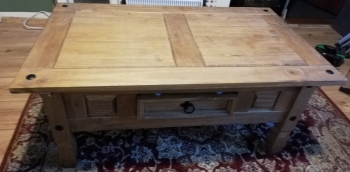 A while a go, I read an article on a FaceBook group about a model railway that was created under the lid of a 9 drawer cupboard. The lid hinged up, buildings placed on the layout, and away it went. I have the same sort of furniture, but realised that my coffee table had a considerable height between the bottom and the lid as it had a small drawer in the middle. I thought that I could sink the railway into the space between, and that way most (if not all) of the scenery could stay in place.
What Scale?
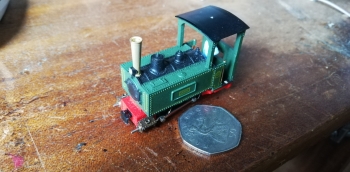 N-gauge track would give me the ability to have a loop but I was thinking that N-scale would be a bit fiddly for me. I looked on ebay for some second hand N-gauge locos and bought an 0-6-0 diesel shunter to play about with.
I then came across this little steam loco. Not knowing anything about it other that it was N-gauge and “a good runner” I bought it. It is apparently a Jouef HO-Scale Narrow "Decauville" I found it to be HO-scale running on N-gauge track creating a HOe loco. I fell in love with the loco and the scale, so this is the direction I am heading.
Magic Mountain
 So after some measuring up, I found some 3D mountain scans on thingiverse.com and managed to adapt (by scaling and chopping) a mountain so it would fit within the layout with the lid closed. Then by using TinkerCad.com I was able to Insert a tunnel through the mountain. Without spoiling the shape of the mountain, I had to cut the design up into 4 parts to fit on my 3D printer. Off went the printer for the next few days. Because I included some inner structure, it is a bit visible from the outside, but I’m hoping that some filler or clay skimmed over the top will hide that a bit.
Initial Designs
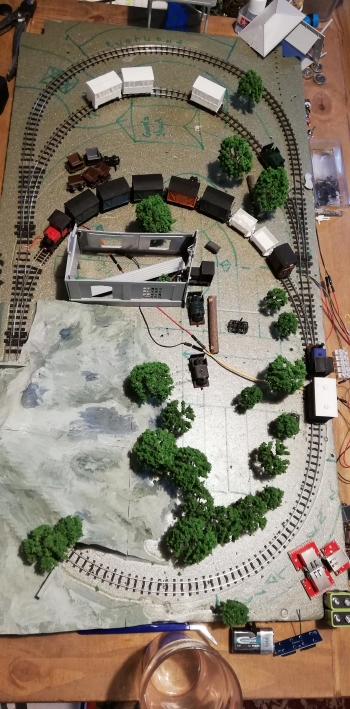 With “Magic Mountain” set up in the corner, that means that there can only be single-line-working on the left of the layout, however this is room to fit in 2 passing loops before the end curve.
 The first will have a turn-table mid-way (opening up access to the engineering works/sidings), the second will have a goods shed, leaving the original end curve to be the main station.
There might be an additional 3 points set into the main loop, creating short sidings at the ends of the 2 straight sections. (The mountain covers where the 4th might have been). The front 2 of these sidings might allow for a “shuttle service” DMU to operate between the 2 stations, and the third might provide for an engine shed for the main-line diesel loco. They would also enable other modular layout boards to join in on the left or right in the future.
Hunslet Quarry Style
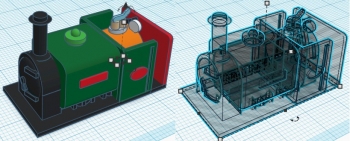 After searching ebay a bit more, I found these small Japanese motorised chassis. Known as “TU-KOPPEL A”, they are 0-4-0 empty chassis. I love the Hunslet quarry locos, so I set about designing and 3D printing a body-shell to go on top of them. The design hides the tallest part (the motor) inside the firebox. You can see photos of the chassis and body-shell in the photos below. The body isn’t truly “to scale” as it would over-hang the chassis and make the whole thing look silly, so it is shortened. But this way there are moving parts and the loco doesn’t need a side skirt to hide the motion.
Photos from testing
Click on an image to open the image gallery


Please note: the rights to any photos displayed remain with the owner of the photo, and if not my own, then they are used purely as examples and I take no credit for them.